
Spring Cloud Microservices Beginner Tutorial (1): Microservices Introduction Spring Cloud Microservices Beginner Tutorial (2): Service Registration and Discovery — Eureka Spring Cloud Microservices Beginner Tutorial (3): Service Registration Spring Cloud Microservices Beginner Tutorial (4): Inter-service Invocation — FeignClient Spring Cloud Microservices Beginner Tutorial (5): Centralized Config — ConfigService Spring Cloud Microservices Beginner Tutorial (6): Spring Cloud BUS Message Bus for Dynamic Config Refresh Spring Cloud Microservices Beginner Tutorial (7): Spring Cloud Stream Message-driven Microservices Spring Cloud Microservices Beginner Tutorial (8): Spring Cloud Zuul API Gateway Dynamic Routing, Cookie Passing, and CORS Spring Cloud Microservices Beginner Tutorial (9): Zuul Gateway Integrating Swagger2 for Auto-generated RESTful API Docs Spring Cloud Microservices Beginner Tutorial (10): Spring Cloud Hystrix Circuit Breaking and Service Degradation Spring Cloud Microservices Beginner Tutorial (11): Spring Cloud Sleuth + Zipkin Service Tracing and Link Monitoring Spring Cloud Microservices Beginner Tutorial (12): Spring Cloud Docker Containerized Deployment
Code will be shared at https://github.com/NeilRen/SpringCloudDemo, with different branches for different chapters; the Master branch contains the final combined content. This chapter’s code is at: https://github.com/NeilRen/SpringCloudDemo/tree/feature/eureka-client
Original This article is original, author: Ren Fei. Please cite the author and source when reposting.
In the previous section we covered “Spring Cloud Microservices Beginner Tutorial (2): Service Registration and Discovery — Eureka”, which set up the microservices registry and discovery center. This section explains how to create a new microservice and register it with the registry.
The API Center Module
Before starting, let me clarify that the “API Center” is not a standard microservices architecture — it is an architecture I designed myself. I think that in a whole architecture there will be many services calling each other, and in team collaboration many people and teams may write their own service modules. Without agreeing on the request addresses, request object structures, and result object structures, efficient collaboration is hard. So I write the interface in advance, defining the controller request addresses, the Request structure, and the Result structure. Then the team responsible for implementing a service only needs to implement the interface, and others calling it know in advance what type of Request to pass and what Result to expect. To state again, the API Center is my own design and is not part of the microservices system; it’s for your reference only. It may not fit your business shape, and you need to design your own; I only provide the idea as a tutorial.
Right-click the root project name and create a Maven sub-project module called api-center, just like creating the eureka module in the previous section (not repeated here). You also need to add a dependency spring-boot-starter-web, because it lets you define the request URL addresses in advance too. The POM after creation:
<?xml version="1.0" encoding="UTF-8"?>
<project xmlns="http://maven.apache.org/POM/4.0.0"
         xmlns:xsi="http://www.w3.org/2001/XMLSchema-instance"
         xsi:schemaLocation="http://maven.apache.org/POM/4.0.0 http://maven.apache.org/xsd/maven-4.0.0.xsd">

    <parent>
        <artifactId>cloud</artifactId>
        <groupId>net.renfei</groupId>
        <version>1.0.0</version>
    </parent>

    <modelVersion>4.0.0</modelVersion>
    <groupId>net.renfei</groupId>
    <artifactId>apicenter</artifactId>
    <version>1.0.0</version>
    <name>APICenter</name>
    <description>API Center</description>

    <dependencies>
        <dependency>
            <groupId>org.springframework.boot</groupId>
            <artifactId>spring-boot-starter-web</artifactId>
        </dependency>
    </dependencies>

</project>
Then, in the api-center sub-project’s src/main/java, create three packages: net.renfei.apicenter.service, net.renfei.apicenter.request, net.renfei.apicenter.result. Under the request package, create a class called BaseRquest as the base class for request bodies, implementing the Serializable interface. Then create a class called DemoRquest that extends BaseRquest, with a member field String msg:
package net.renfei.apicenter.request;

public class DemoRquest extends BaseRquest implements Serializable {
    private static final long serialVersionUID = 1L;
    private String msg;
    public String getMsg() {
        return msg;
    }
    public void setMsg(String msg) {
        this.msg = msg;
    }
}
Under the net.renfei.apicenter.result package, create a Result class, which will be our unified return format:
package net.renfei.apicenter.result;

import java.io.Serializable;

public class Result implements Serializable {
    private static final long serialVersionUID = 1L;
    private int code;
    private String message;
    private Object object;

    public int getCode() {
        return code;
    }
    public void setCode(int code) {
        this.code = code;
    }
    public String getMessage() {
        return message;
    }
    public void setMessage(String message) {
        this.message = message;
    }
    public Object getObject() {
        return object;
    }
    public void setObject(Object object) {
        this.object = object;
    }
}
Then, under the net.renfei.apicenter.service package, create an interface called DemoService:
package net.renfei.apicenter.service;

import net.renfei.apicenter.request.DemoRquest;
import net.renfei.apicenter.result.Result;
import org.springframework.web.bind.annotation.GetMapping;
import org.springframework.web.bind.annotation.PostMapping;

public interface DemoService {
    @GetMapping("/")
    Result index();

    @PostMapping("/sayMsg")
    Result sayMsg(DemoRquest demoRquest);
}
With this, the interface defines the service address, service name, request type, and return type — this is the DemoService interface.
Create a New Service Provider
Right-click the project root and create a blank Maven project named demoservice as the service provider. Modify the POM; here it depends on spring-cloud-starter-netflix-eureka-client, spring-boot-starter-web, and the apicenter module:
<?xml version="1.0" encoding="UTF-8"?>
<project xmlns="http://maven.apache.org/POM/4.0.0"
         xmlns:xsi="http://www.w3.org/2001/XMLSchema-instance"
         xsi:schemaLocation="http://maven.apache.org/POM/4.0.0 http://maven.apache.org/xsd/maven-4.0.0.xsd">

    <parent>
        <artifactId>cloud</artifactId>
        <groupId>net.renfei</groupId>
        <version>1.0.0</version>
    </parent>

    <modelVersion>4.0.0</modelVersion>
    <groupId>net.renfei</groupId>
    <artifactId>demoservice</artifactId>
    <version>1.0.0</version>
    <name>demo-service</name>
    <description>Demo Service</description>

    <dependencies>
        <dependency>
            <groupId>org.springframework.cloud</groupId>
            <artifactId>spring-cloud-starter-netflix-eureka-client</artifactId>
        </dependency>
        <dependency>
            <groupId>org.springframework.boot</groupId>
            <artifactId>spring-boot-starter-web</artifactId>
        </dependency>
        <dependency>
            <groupId>net.renfei</groupId>
            <artifactId>apicenter</artifactId>
            <version>1.0.0</version>
        </dependency>
    </dependencies>

    <build>
        <plugins>
            <plugin>
                <groupId>org.springframework.boot</groupId>
                <artifactId>spring-boot-maven-plugin</artifactId>
            </plugin>
        </plugins>
    </build>

</project>
Then create the package net.renfei.demoservice.controller, and create the application.yml file in resources:
server:
  port: 18080
spring:
  application:
    name: DemoService
eureka:
  client:
    service-url:
      defaultZone: http://localhost:8761/eureka/
application.yml sets the startup port, application name, and the Eureka registry address. Here http://localhost:8761/eureka/ is our Eureka registry address; see the configuration process in “Spring Cloud Microservices Beginner Tutorial (2): Service Registration and Discovery — Eureka”.
Under the net.renfei.demoservice.controller package, add a DemoController that implements DemoService:
package net.renfei.demoservice.controller;

import net.renfei.apicenter.request.DemoRquest;
import net.renfei.apicenter.result.Result;
import net.renfei.apicenter.service.DemoService;
import org.springframework.web.bind.annotation.RestController;

@RestController
public class DemoController implements DemoService {
    @Override
    public Result index() {
        Result result = new Result();
        result.setCode(200);
        result.setMessage("You're visiting DemoService.");
        return result;
    }

    @Override
    public Result sayMsg(DemoRquest demoRquest) {
        Result result = new Result();
        result.setCode(200);
        result.setMessage("This is DemoService, Your Mag is: " + demoRquest.getMsg());
        return result;
    }
}
Then, under the net.renfei.demoservice package, create a DemoServiceApplication class as the module’s startup entry:
package net.renfei.demoservice;

import org.springframework.boot.SpringApplication;
import org.springframework.boot.autoconfigure.SpringBootApplication;
import org.springframework.cloud.netflix.eureka.EnableEurekaClient;

@EnableEurekaClient
@SpringBootApplication
public class DemoServiceApplication {
    public static void main(String[] args) {
        SpringApplication.run(DemoServiceApplication.class, args);
    }
}
Unlike a plain Spring Boot app, we added the @EnableEurekaClient annotation, which is the Eureka client and registers itself with the Eureka registry. With that, a service is complete.
Run the Microservice Registration
At this point, the microservices registration and discovery is done. Start eureka first, then demoservice, and let’s test. After everything is up and you visit the Eureka address we configured — that is the registry — if it opens, it’s a success. In my case it’s: http://localhost:8761
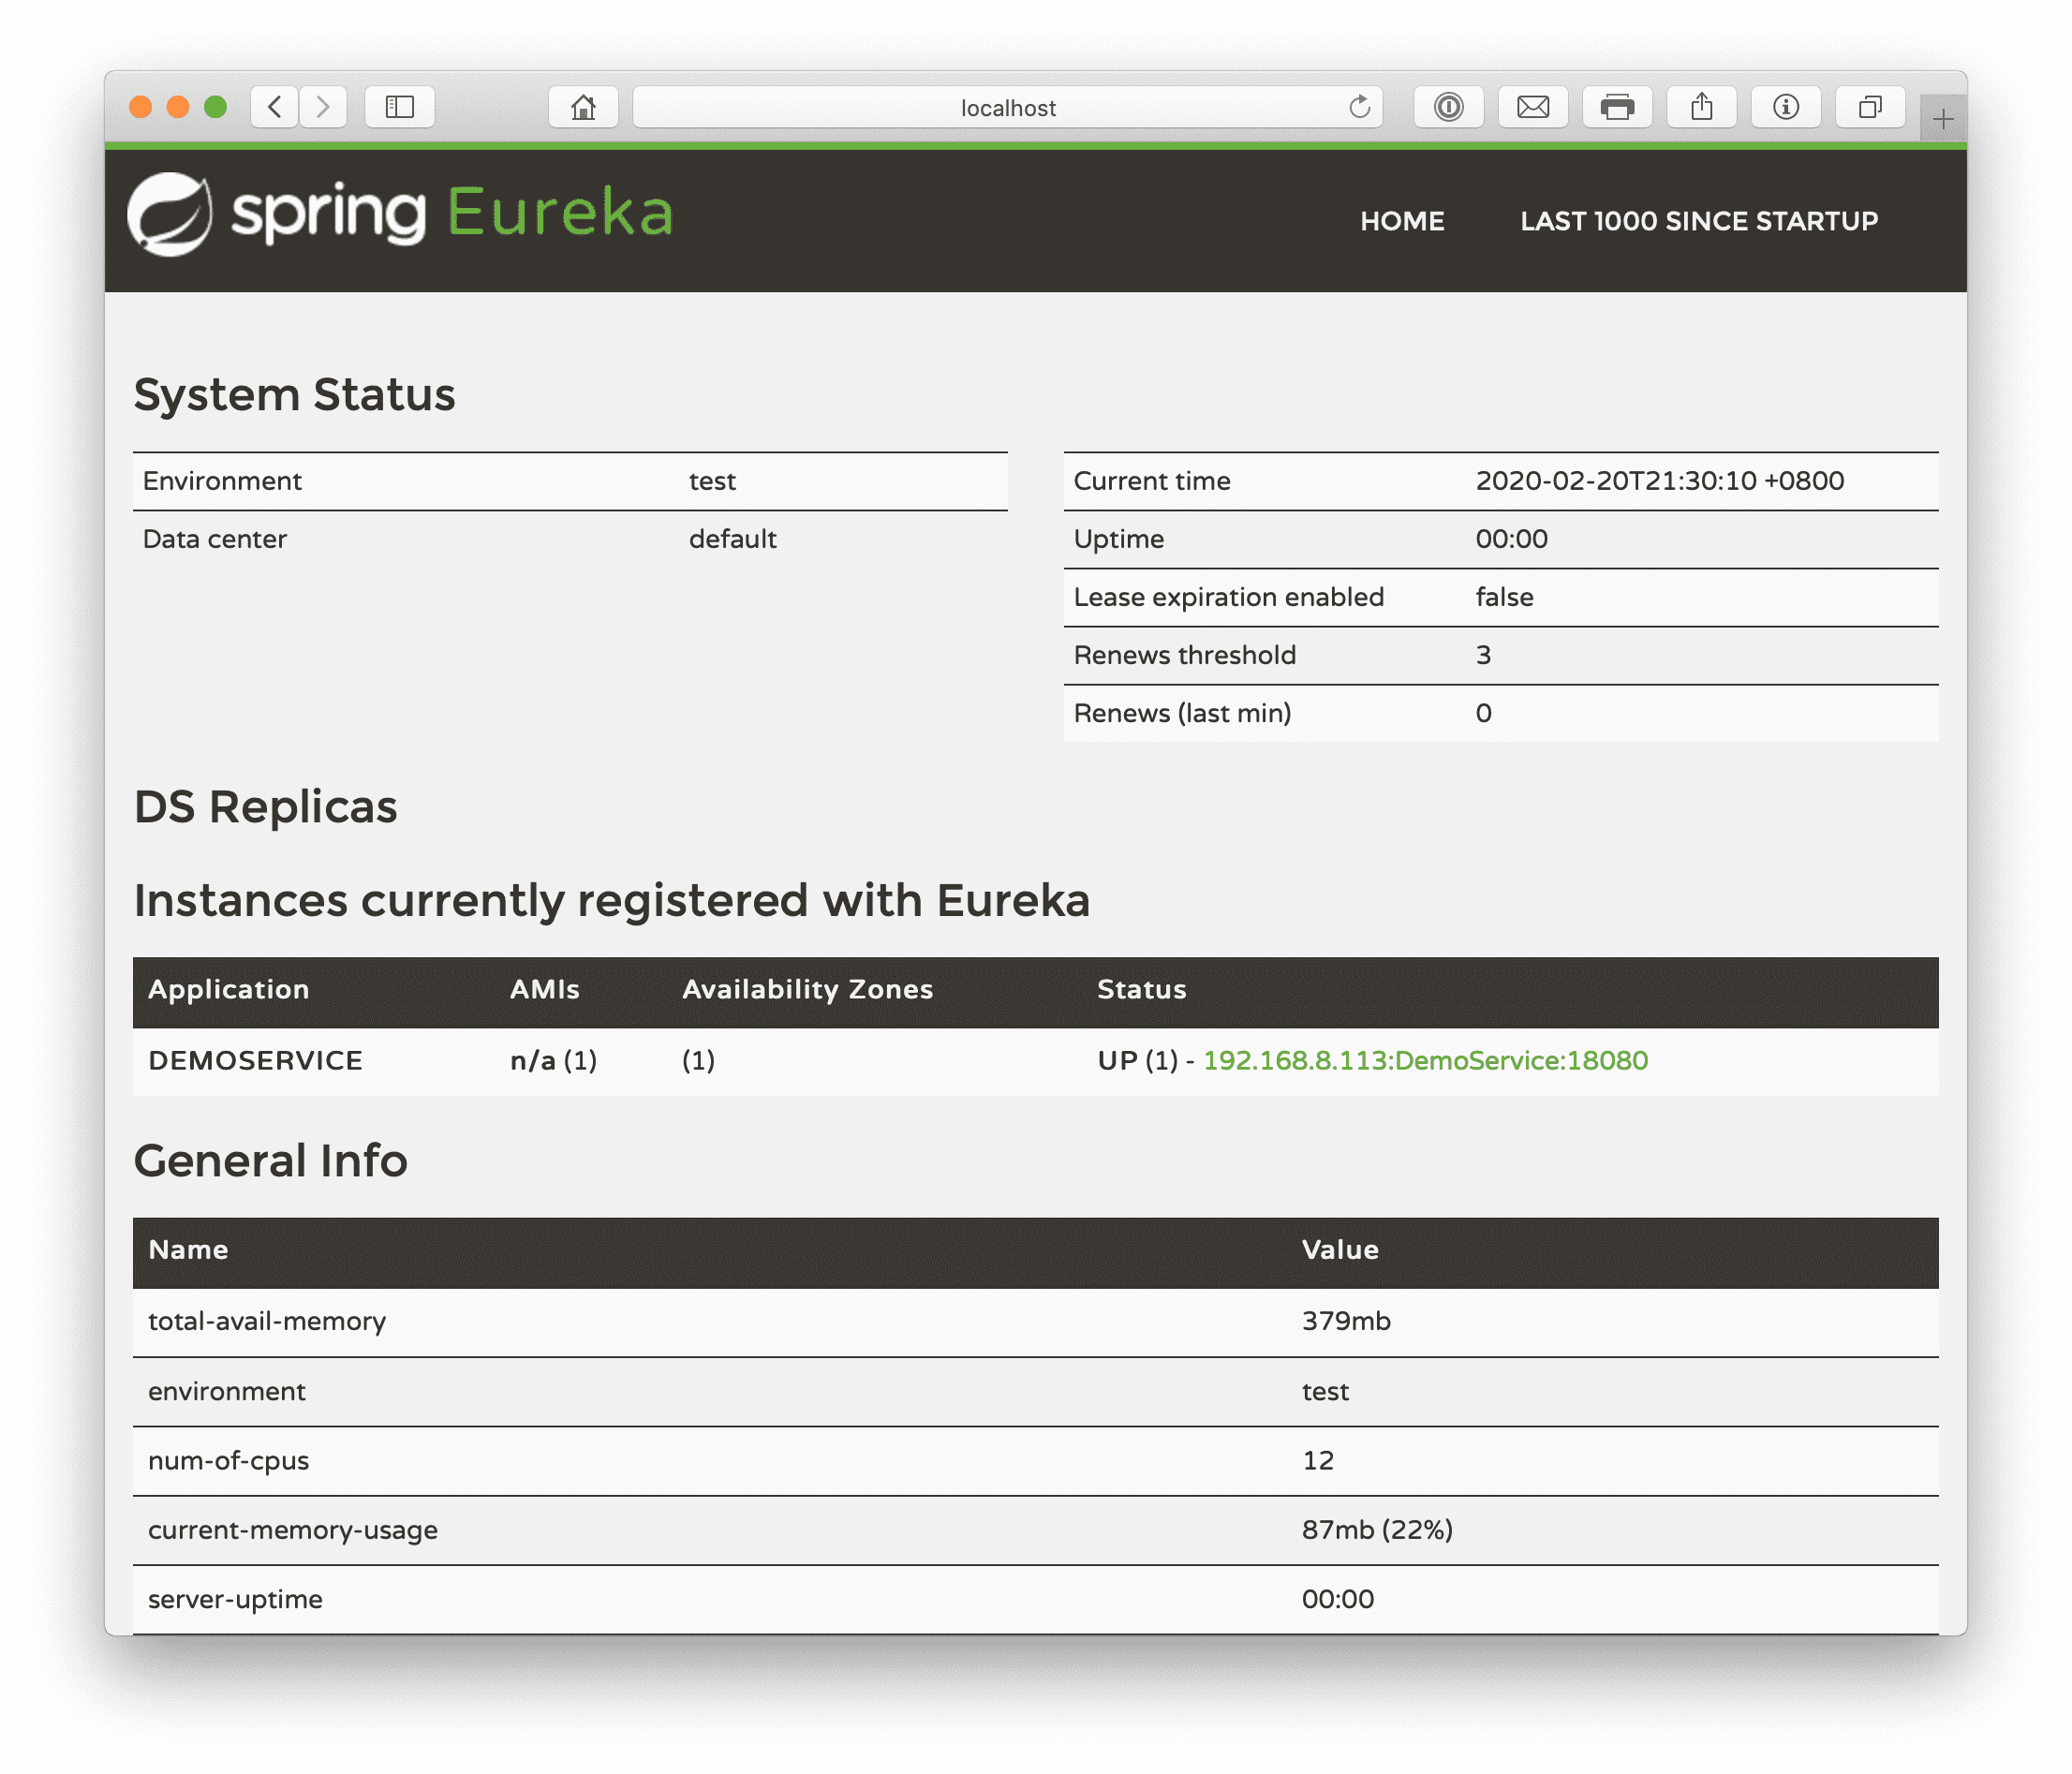
You can see that under “Instances currently registered with Eureka” one service has been found: “DEMOSERVICE”.