
The two previous posts — Notes on compiling OpenWRT (LEDE) yourself and Building OpenWRT (LEDE) free in the cloud with GitHub Actions — covered compiling OpenWRT (LEDE). This one records the x86_64 install.
Let’s get OpenWRT (LEDE) onto x86_64 hardware, a.k.a. flashing it. x86_64 means a 64-bit x86 CPU, common in industrial PCs. Consumer wireless routers use different chips, so first check whether the chip platform supports OpenWRT, then build an image for that platform. Images are not interchangeable.
Download x86_64 Firmware
The previous two posts already cover manual and automated builds, so I won’t repeat that. The thing to remember is to compile for your own device’s architecture. Mine is x86_64, so my output file is named openwrt-x86-64-generic-squashfs-combined-efi.img. Download and prepare whichever firmware matches your device.
Prepare Before Writing
Besides the firmware image you need a USB drive, imaged with WinPE as a boot disk. I recommend WeiPE Toolbox — not an ad, it’s genuinely clean and easy to use. Skip this step if you already have a WinPE drive.
You also need physdiskwrite.exe, an IMG-to-disk writer. If you can’t be bothered to hunt for it, grab my copy: https://cdn.renfei.net/share/physdiskwrite.exe
Boot from USB
Put the firmware and physdiskwrite.exe on the WinPE USB drive and boot the router from it. Every motherboard BIOS differs; if you don’t know how to pick a boot device, search online for your board’s hotkey and hold it down while powering on.

Write to Disk
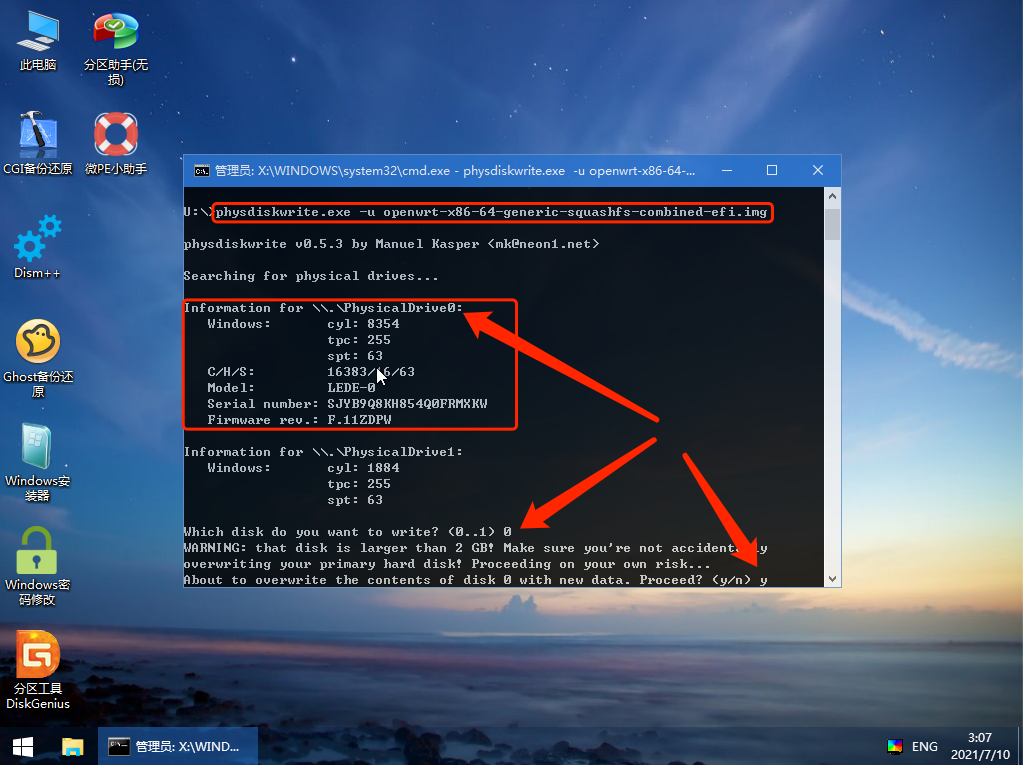
Once inside WinPE, go to Start -> Run -> cmd. Type your USB drive’s letter — mine is U — followed by Enter to switch into that drive:
u:Then cd into the directory holding physdiskwrite.exe and run it:
physdiskwrite.exe -u openwrt-x86-64-generic-squashfs-combined-efi.imgThe physdiskwrite.exe -u part is fixed; replace the filename with your own. Type a few characters and press Tab to autocomplete.
Press Enter and it lists the disks. I have only one, so I enter 0 to write to disk 0.
It then warns you that writing will overwrite the disk and asks to confirm. Type y and press Enter, then wait for it to finish.
Into OpenWRT
Reboot the router once writing completes, connect an Ethernet cable between it and your computer, and set your network card to obtain an IP automatically.
Then open http://192.168.1.1 in a browser for the management page. The password is password. From here, you’re on your own — enjoy.