
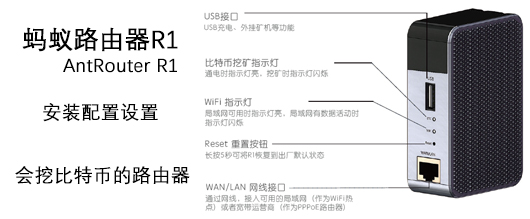
The previous blog post showed you the AntRouter R1 unboxing photos — were you looking forward to it? Today I bring you the AntRouter R1 setup, configuration, and installation illustrated guide, walking you through installing and configuring the AntRouter R1 step by step, so you can smoothly install this Bitcoin-mining router and win your 25 BTC reward sooner (one block reward was 25 BTC at publication time).
Tip BTC:__1Pinyr9RuYo3eX6DT9qj2KVhd4TwLA6tf5
Note: the following views are my personal opinions, for reference only; please decide for yourself. If reprinted, please credit the author and link to this article.
Bitcoin Reward
The AntRouter R1 mines in SOLO mode, and it’s forced SOLO, unmodifiable. So if you ever win, you’ll get the entire block reward, which is a considerable sum — one block rewards 25 BTC at publication time.
Designated Mining Pool
The AntRouter R1 forcibly designates the AntPool for SOLO mining, and it’s unmodifiable. Also you need to have a Bitmain account, because the router settings require filling in a Bitmain account to do SOLO mining.
Connect to WIFI signal antRouter-MAC
Power on the AntRouter R1, and a password-free WIFI signal starting with antRouter will be found. Connect to it; no password is needed. The wireless network card should be configured in auto-obtain-IP mode. See the picture below: 
Access the Router Management Page
The router management page address is: http://192.168.200.1/ . Open this URL in a browser to open the management page, as shown below; the default account and password are both root. 
Change System Language to Chinese
Select in order: System ==> System ==> Language and Style, choose chinese in the Language option, click Save, refresh the page and it’s the Chinese interface, as shown below: 
Set WIFI Signal Name
Select in order: Network ==> radio0 ==> Interface Configuration ==> Basic Settings ==> ESSID, that’s the WIFI name. Change it to your desired name and click Save, as shown below: 
Set WIFI Password
Select in order: Miner ==> radio0 ==> Interface Configuration ==> Wireless Security ==> Encryption, choose the option as shown, set the password, click Save, as shown below: 
Set Mining Account
Select in order: Network ==> R1 Mine, enter your Bitmain account, click Save, as shown below: 
Apply All Changes
Click the red text “Unsaved Changes” at the top right of the screen, click Save & Apply to make all settings take effect.
View the Router’s Hashrate and Mining Status in the Pool
Log into AntPool, choose AntRouter for the sub-account, and you can see the router’s status, as shown below: 


Tip Bitcoin: __1Pinyr9RuYo3eX6DT9qj2KVhd4TwLA6tf5