
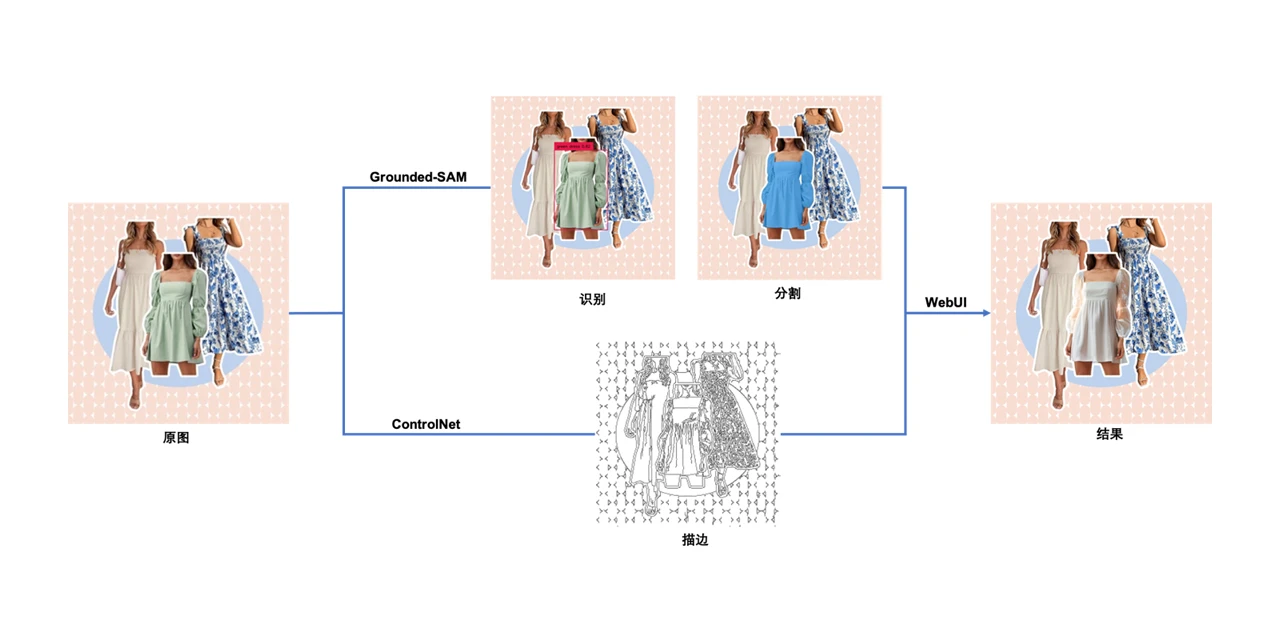
Thanks to all readers for the attention and love the “Miaobishenghua” (magic brush) series has received. In the first post of the series we showed how to quickly set up a hosted AI painting visualization environment based on SageMaker Notebook (link in the note below), and we’ve gotten positive feedback and suggestions — the solution keeps iterating. In this post we’ll cover: 1. new features: ControlNet and Image browser plugin support; 2. within e-commerce/advertising, using the latest visual tooling Grounded-SAM on the new version for controllable text-to-image generation, accelerating marketing material production; 3. FAQ for this solution.
Note: please refer to the previous post, “Quickly build a hosted Stable Diffusion AI drawing visualization environment based on SageMaker Notebook”, and deploy the latest version — everything below assumes the latest solution. We still recommend deploying in us-east-1 and choosing ml.g4 or ml.g5 instance types per your needs.
Part 1: New features
1. Extensions and plugins
1.1 ControlNet
ControlNet is a plugin for the Stable Diffusion WebUI that introduces new control modes for text-to-image — pose, depth, line-art colorization and more — making output far more controllable. ControlNet trains a separate model per input category; eight are public: canny, depth, hed, mlsd, normal, openpose, scribble, segmentation. See the table below.
| Preprocessor | Model | Description |
|---|---|---|
| canny | control_canny | Edge detection. Extracts line art from the original image to generate a picture with the same composition. |
| depth | control_depth | Depth detection. Captures scene depth and foreground/background relationships. |
| hed | control_hed | Edge detection retaining more detail; good for recoloring and stylization. |
| mlsd | control_mlsd | Line segment detection. Poor at people; excellent for architecture. |
| normal_map | control_normal | Generates normal maps from the image; great for CG modelers. |
| openpose | control_openpose | Extracts skeletal pose. |
| openpose_hand | control_openpose | Extracts skeletal pose including hands. |
| scribble | control_openpose | Extracts black-and-white sketches. |
| fake_scribble | control_scribble | Scribble-style extraction (a very powerful model). |
| segmentation | control_seg | Semantic segmentation. |
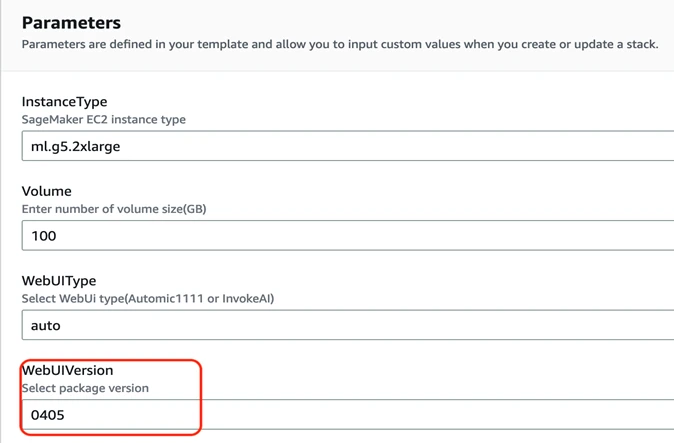
The latest WebUIVersion – 0405 build of this solution ships with the ControlNet plugin by default (see FAQ 1 in Part 3). Just download the models as follows and you’re ready to use ControlNet.
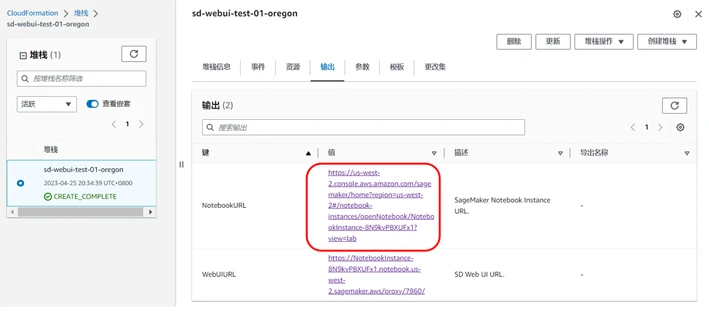
- In CloudFormation → Stacks → Outputs (see the previous post, section 4.3 step 12), find the NotebookURL link and open the SageMaker Notebook Instance
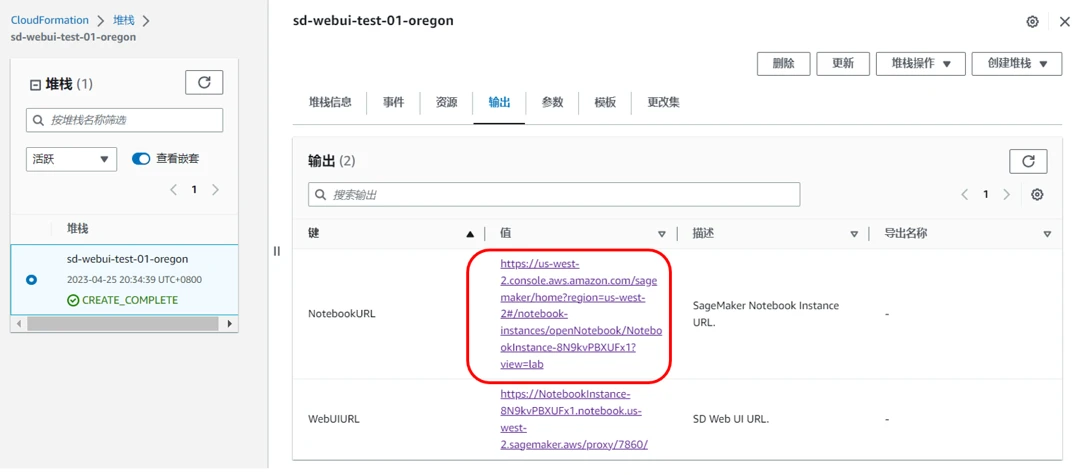
- Open a terminal: File → New → Terminal
- Enter the commands below to start downloading (time depends on server network conditions)
cd SageMaker/sd-webui
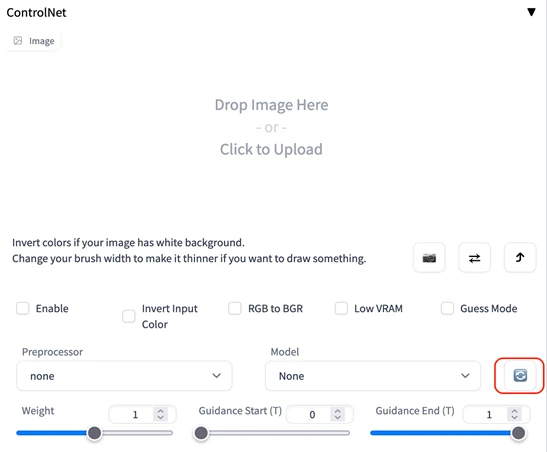
./download-controlnet-models.sh- When the download finishes, return to the Stable Diffusion Web UI, hit “Refresh” in ControlNet, and the models are installed
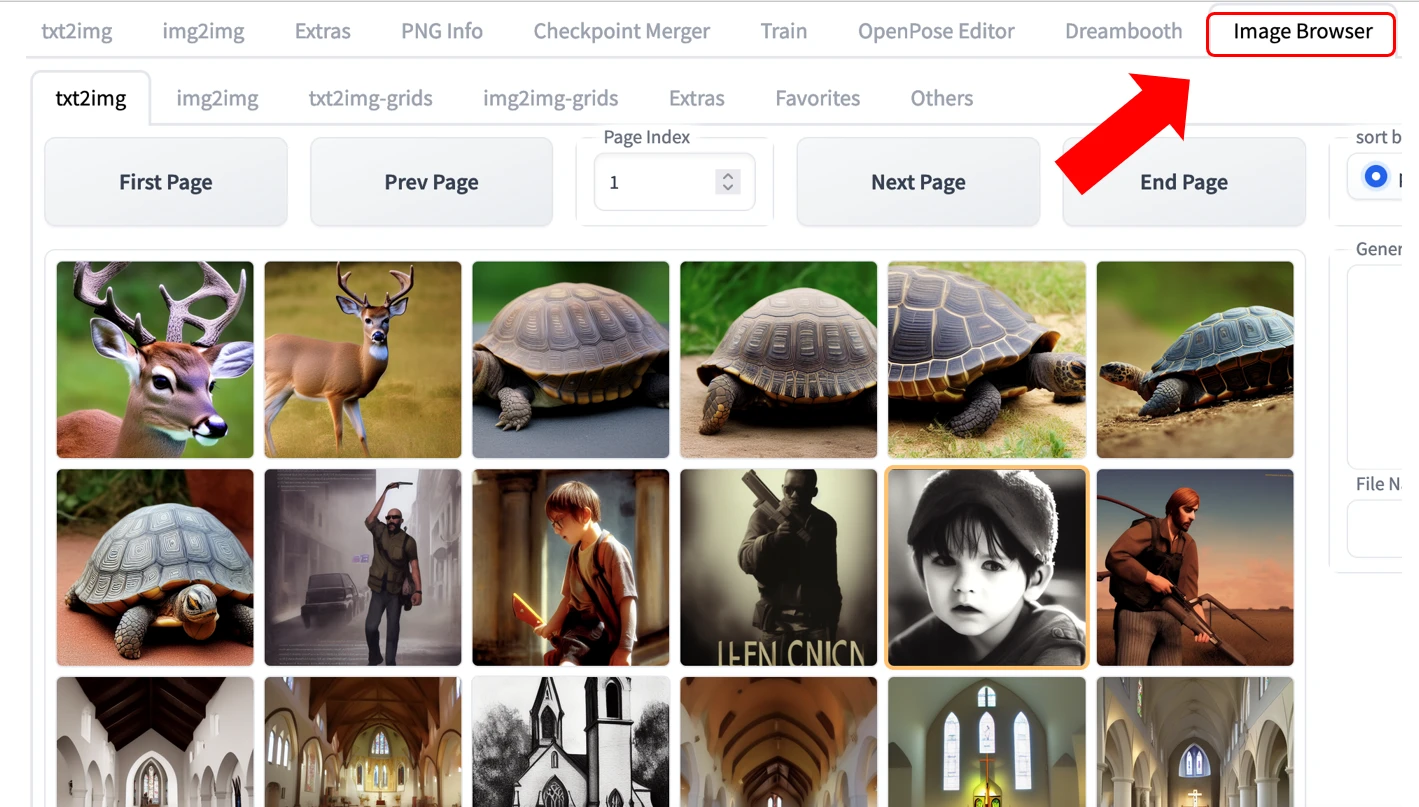
1.2 Image Browser
New Image Browser plugin support — conveniently browse your generation history:
2. Region support
New: US West (Oregon) region.
Part 2: E-commerce ad material generation
1. Background
In e-commerce image material generation, a very common task is targeted modification of part of an image. In the past this mostly required a designer with professional editing software and considerable time. With today’s AI capabilities, it can be done far more simply and efficiently.
In this post we’ll show how to achieve the end-to-end image editing shown below on the new version, using Stable Diffusion WebUI and Grounded-SAM: 1. code-free image editing (manual mask) for designers and creators who don’t code, and 2. automated code-driven image editing (automatic mask) for developers and AIGC enthusiasts.
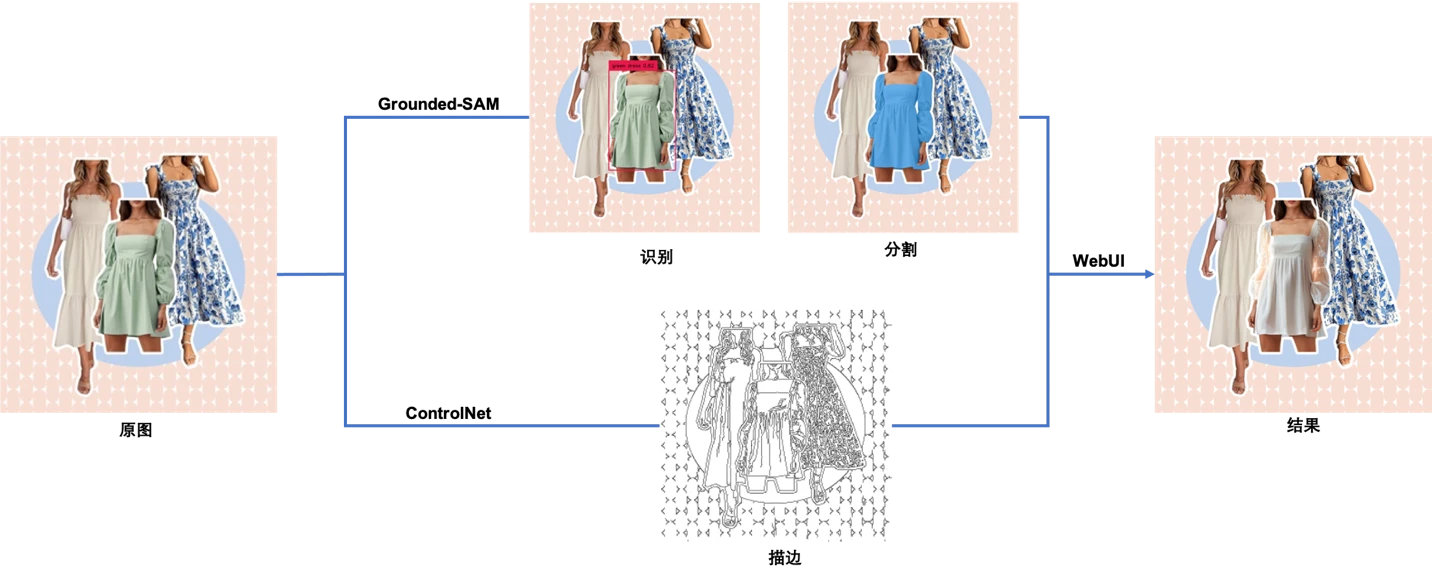
2. Models used
2.1 Realistic Vision
Realistic Vision is a model for generating photorealistic images. It creates highly realistic portraits of different ages, ethnicities and clothing styles — they look like photographs.
2.2 ControlNet
ControlNet is a pretrained model based on Stable Diffusion 1.5. In the author Lvmin Zhang’s paper, ControlNet controls a pretrained large diffusion model through input conditions: using edge features, depth features or human pose skeletons from the input image, combined with a text prompt, it precisely guides the generation result in SD 1.5. ControlNet has 8 models; this post uses control_canny.
2.3 Grounded-SAM
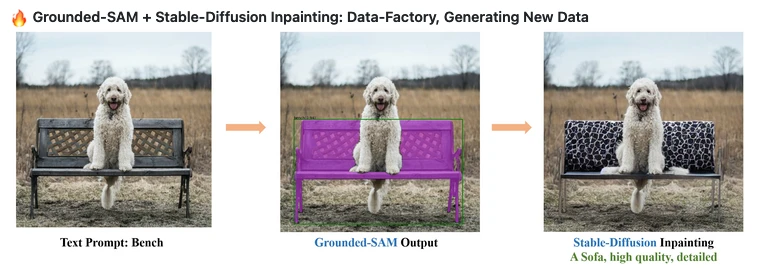
Grounded-Segment-Anything (Grounded-SAM) is a popular open source multimodal image workflow built on Grounding DINO (detector) and the Segment Anything Model (segmenter). Grounded-SAM pairs directly with Stable Diffusion for controllable text-to-image generation.
2.3.1 Grounding DINO
Grounding DINO: a zero-shot image detection model that detects objects in an image from a text description, producing bounding boxes.
2.3.2 Segment Anything Model (SAM)
Segment Anything Model (SAM): a high-quality image segmentation model that segments images using auxiliary points and boxes as prompts. Its training set includes over 1 billion masks across 11 million images — the largest open dataset for image segmentation to date. Meta claims SAM has learned a general notion of “what an object is”, so it can segment without additional training.
3. Code-free image editing (manual mask)
Steps:
3.1 Download the demo image here.
3.2 In CloudFormation → Stacks → Outputs, find the NotebookURL link and open the SageMaker Notebook Instance.
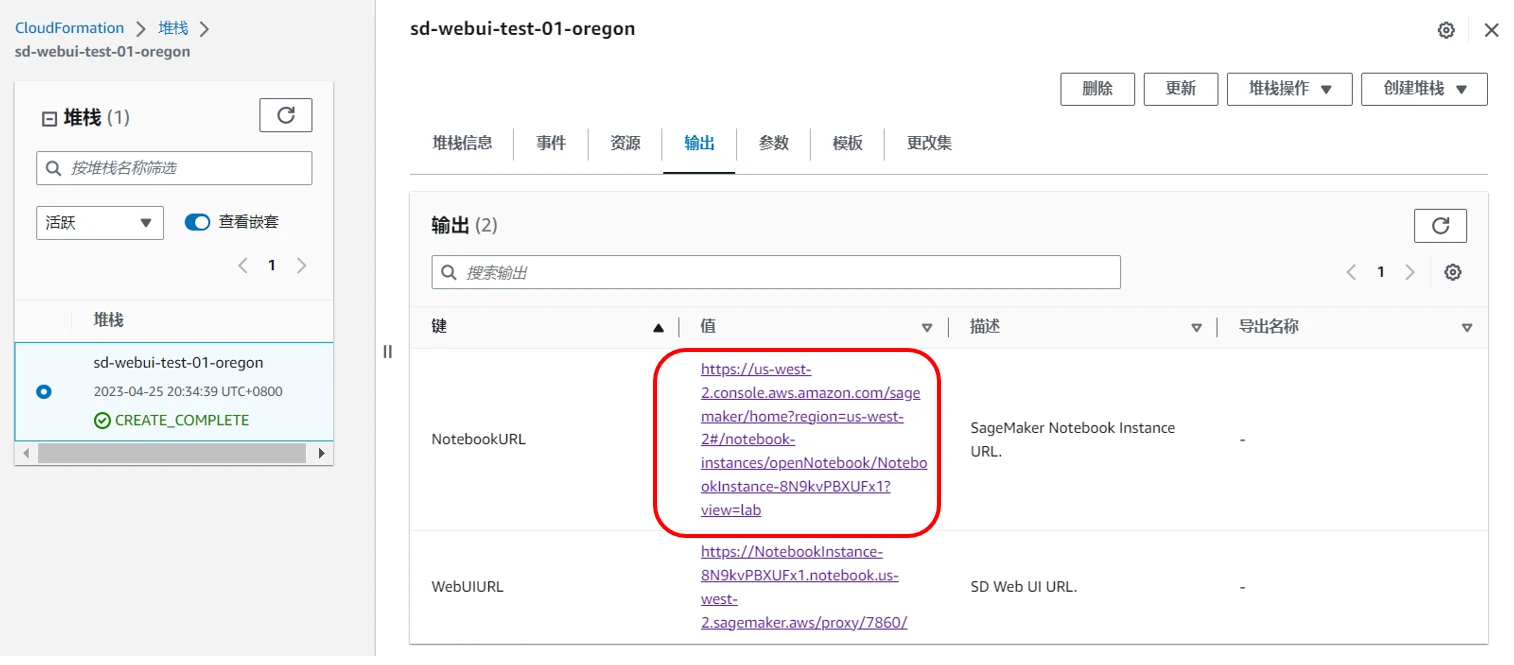
3.3 Click Terminal and run the following commands to download the Realistic Vision V1.3 model:
cd SageMaker/
wget https://huggingface.co/SG161222/Realistic_Vision_V1.3/resolve/main/Realistic_Vision_V1.3-inpainting.ckpt
sudo mv Realistic_Vision_V1.3-inpainting.ckpt ./sd-webui/data/StableDiffusion/
We used the Realistic Vision V1.3 model from HuggingFace. You can also download Realistic Vision V2.0 directly from CIVITAI — the results are very close.
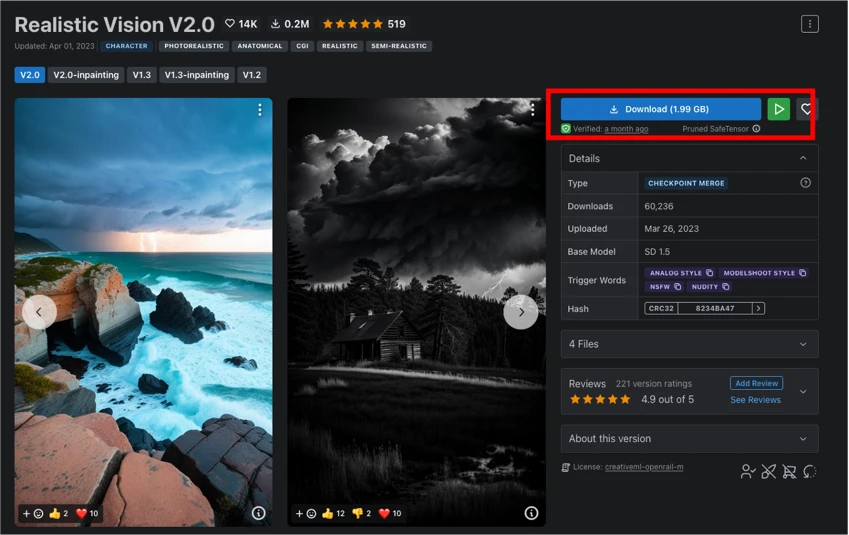
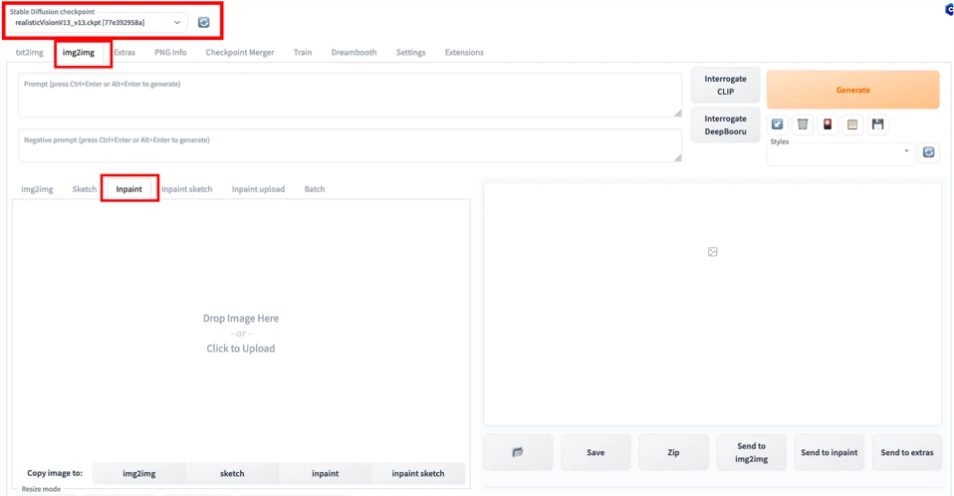
3.4 In the WebUI, select the freshly downloaded Realistic Vision V1.3 as the base model, and choose img2img → Inpaint as the task type. “Inpaint” is a subcategory of img2img: completing or regenerating part of an image through a mask.
3.5 Upload the original image and hand-draw a mask over the area you want to edit.
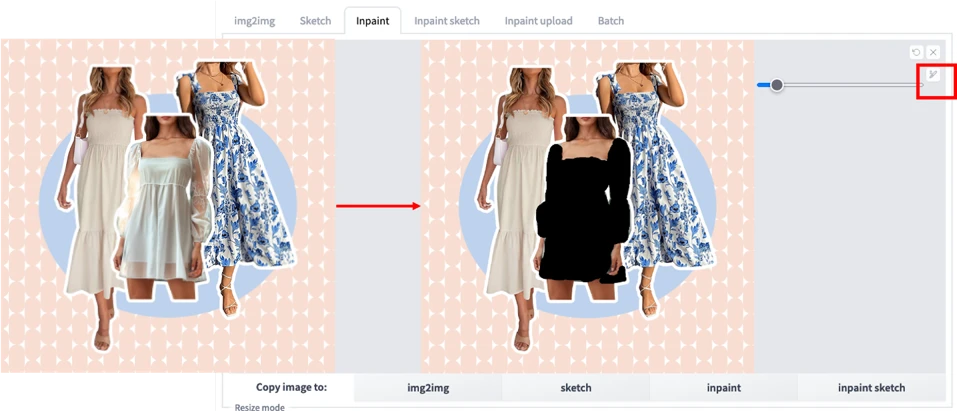
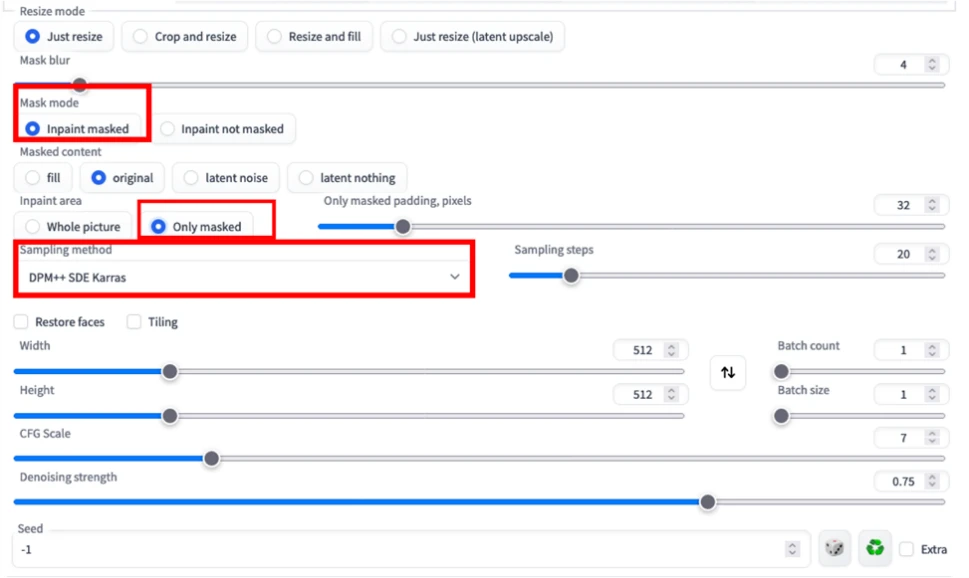
3.6 Configure the Inpaint parameters as shown. Here we generate only within the masked region.
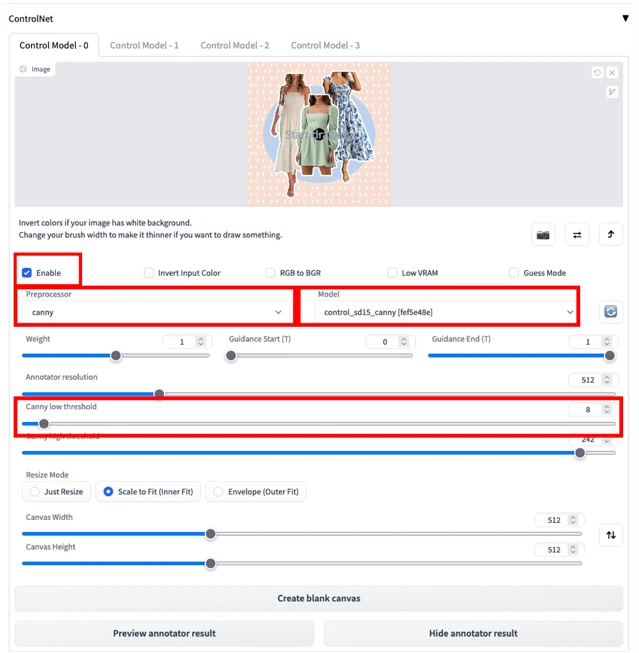
3.7 Upload the original image to ControlNet and configure as shown. ControlNet strengthens control over the final generation. Here we pick the Canny preprocessor and the corresponding Canny model to generate an edge map; lowering “Canny lower threshold” preserves more of the original’s edge detail, as shown. See the FAQ for installing ControlNet models, and the model table above for what Canny does.
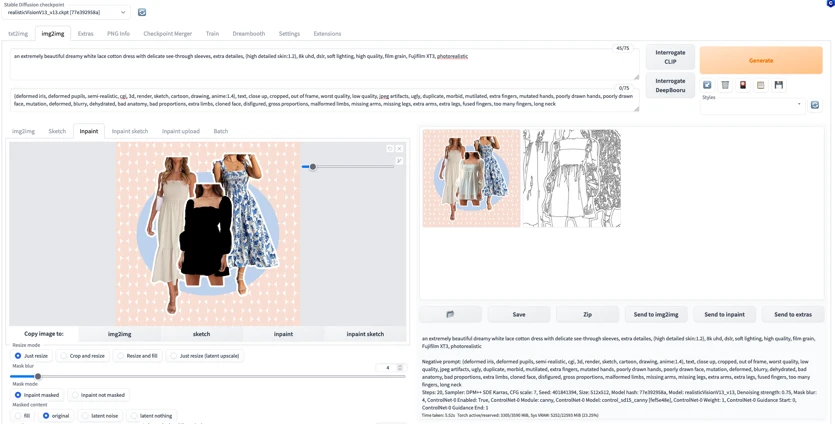
3.8 Enter prompts following the templates below and click Generate.
Prompt = an extremely beautiful dreamy white lace cotton dress with delicate see-through sleeves, extra detailes, (high detailed skin:1.2), 8k uhd, dslr, soft lighting, high quality, film grain, Fujifilm XT3, photorealistic
Negative Prompt = (deformed iris, deformed pupils, semi-realistic, cgi, 3d, render, sketch, cartoon, drawing, anime:1.4), text, close up, cropped, out of frame, worst quality, low quality, jpeg artifacts, ugly, duplicate, morbid, mutilated, extra fingers, mutated hands, poorly drawn hands, poorly drawn face, mutation, deformed, blurry, dehydrated, bad anatomy, bad proportions, extra limbs, cloned face, disfigured, gross proportions, malformed limbs, missing arms, missing legs, extra arms, extra legs, fused fingers, too many fingers, long neck

3.9 After generation, we get this result.
Summary: the workflow above is simple, but hand-drawing a mask every time is slow. Next, code-driven editing.
4. Fully automated image editing (automatic mask)
Combining Grounding DINO (detector) and Segment Anything (segmenter), Grounded-SAM becomes an extremely powerful visual combo: CV semantic segmentation driven by a text prompt. Paired with Stable Diffusion, it opens up many possibilities for productionized multimodal image generation. Steps:
4.1 In CloudFormation → Stacks → Outputs, find the NotebookURL link and open the SageMaker Notebook Instance.
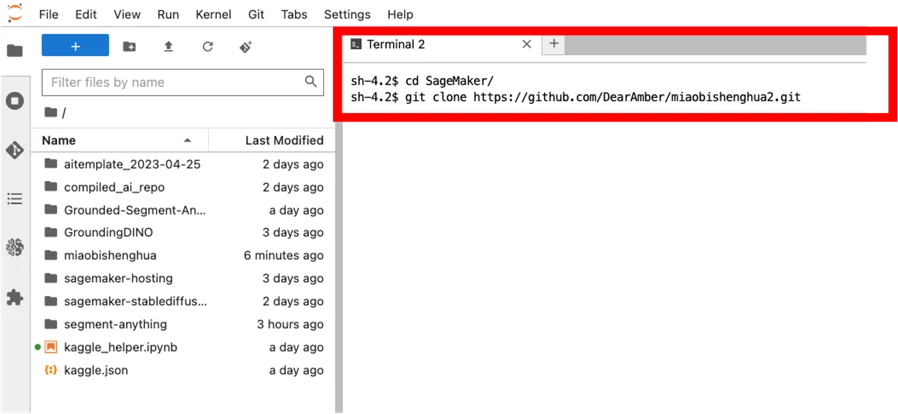
4.2 Click Terminal and run:
cd SageMaker/
git clone https://github.com/DearAmber/miaobishenghua2.git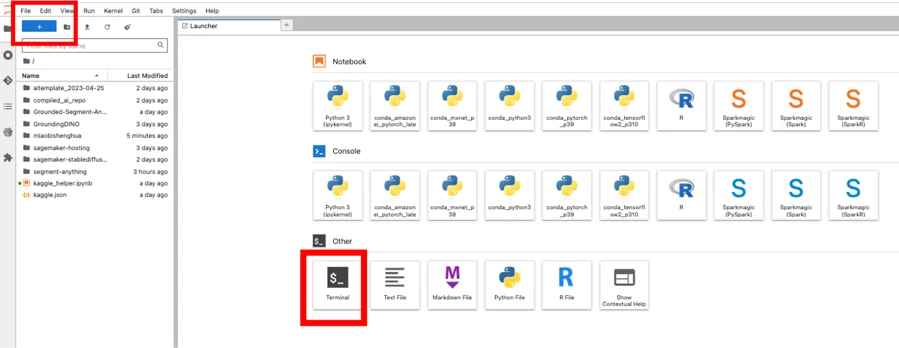
4.3 In the left navigation, enter “miaobishenghua2” and double-click “g-seg-local.ipynb”. Select “conda_pytorch_p39” as the environment.
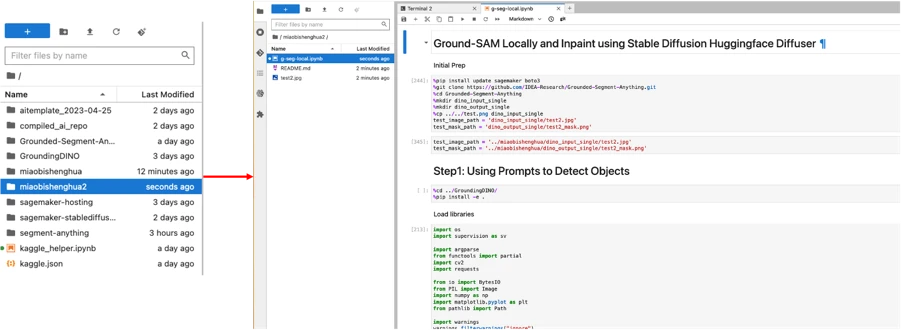
4.4 Run all code cells in order. The flow has three main parts.
4.4.1 Grounding DINO: text description → bounding box
This shows using Grounding DINO to generate predicted boxes from a text description. For example, to select the green dress, enter “green dress” as the prompt:
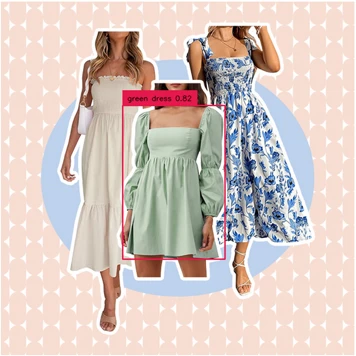
You can tune “box_threshold” to control detection confidence and “text_threshold” to control prompt relevance, filtering the final result (see the code). The boxes serve as auxiliary prompts for the segmentation step below.
Try “white dress with blue patterns” and you’ll get this: the leftmost dress is also white, but without blue patterns it isn’t selected.
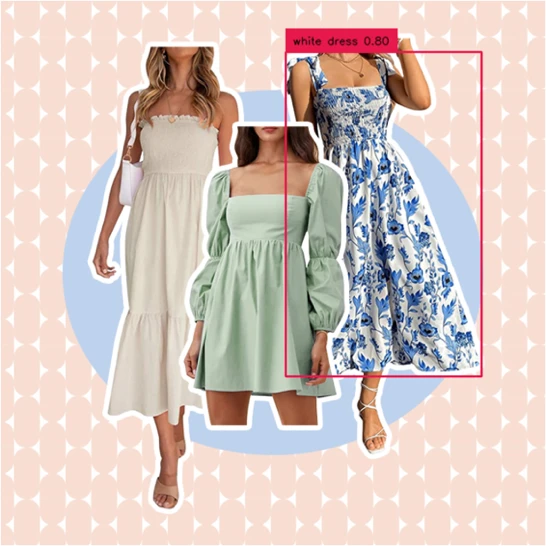
4.4.2 Segment Anything: bounding box → segmentation mask
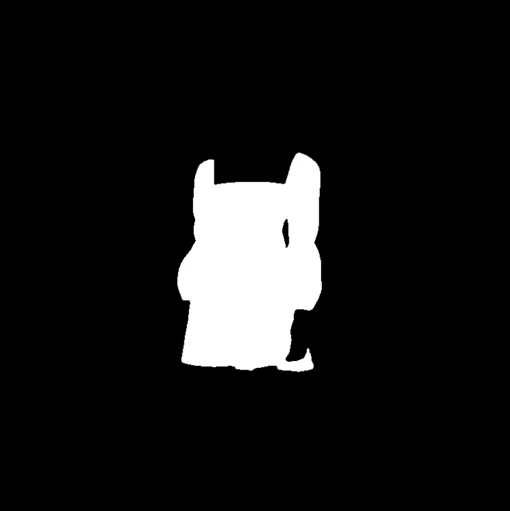
This shows using Segment Anything to generate a mask from the predicted box above. The predicted box is fed in as an auxiliary prompt, and multimask_output=False limits output to a single mask (see code). Result below. Segment Anything also supports single- and multi-point prompts, so even from just the original image you can quickly auto-generate masks in batch.

4.4.3 Stable Diffusion Inpainting: replace the masked content
Finally, use Stable Diffusion’s Inpainting model to replace the content inside the mask. For the experiment we used an ml.g5.2xlarge instance — adjust os.environ["CUDA_VISIBLE_DEVICES"] = "0" per your instance type. Here we used the stable-diffusion-2-inpainting model (see code).
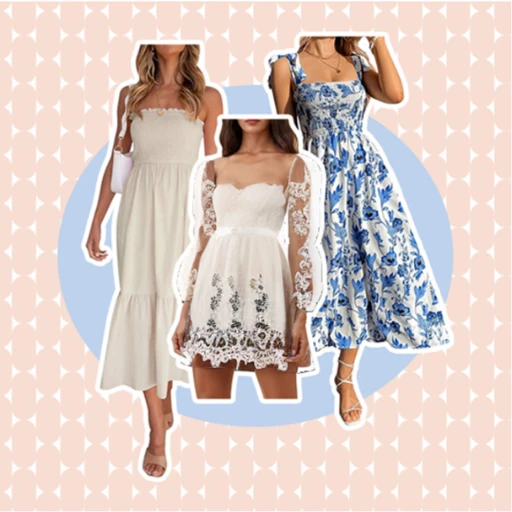
Summary: with this approach, fully automated image editing and material generation becomes far easier and more efficient. In real production you’d often want a more elaborate engineering architecture around the workflow. Note that the Stable Diffusion here comes from HuggingFace diffusers; since teams inside most enterprises collaborate closely (designers and developers), we recommend the Stable Diffusion WebUI API for code-driven generation workflows, keeping parameters consistent. This sample is best treated as a quick validation for a fully automated workflow.
Part 3: FAQ
1. How do I update to the latest version (0405)?
Install per the procedure in “Quickly build a hosted Stable Diffusion AI drawing visualization environment based on SageMaker Notebook”. WebUIVersion defaults to 0405. In-place upgrades aren’t supported yet — reinstall.
2. What about service quota issues during deployment?
Before deploying, confirm in the region’s Service Quotas that the relevant SageMaker Notebook quota (e.g. ml.g4dn.2xlarge for notebook instance usage) has been raised. Steps: link.
3. How do I use models downloaded from the internet?
- On the CloudFormation Outputs page, open the NotebookURL link
- In the left navigation, locate the sd-webui/data directory
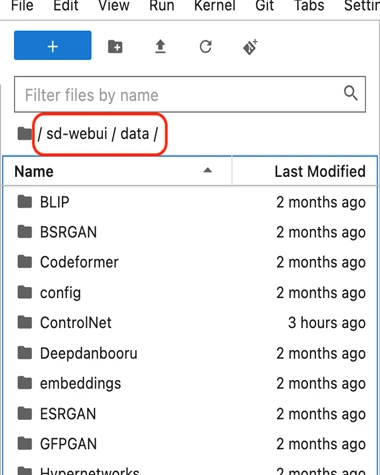
- Stable Diffusion base models go in the StableDiffusion directory
- Lora models go in the Lora directory
- ControlNet models go in the ContrloNet directory
- User fine-tuned models also go in StableDiffusion by default
4. How do I switch between Automatic and InvokeAI?
- On the CloudFormation Outputs page, open the NotebookURL link
- Open a terminal: File → New → Terminal
- Enter the directory:
cd SageMaker/sd-webui- Start the Automatic WebUI:
./startAuto.sh- Start the Invoke WebUI:
./startInvoke.sh5. Version management
We keep the two latest solution versions: 0405 and 0316.
Wrap-up
This post covered the new features added to the previous solution — ControlNet and Image Browser plugin support, plus the new US West (Oregon) region — and walked through generating marketing materials for e-commerce advertising with Grounded-SAM on SageMaker: 1. code-free image editing via ControlNet’s Canny model plus Inpaint, and 2. code-driven editing via Grounded-SAM (Grounding DINO and Segment Anything). We’ll keep adding customer-driven solutions to the “Miaobishenghua” series. Questions or needs? Reach out anytime.